Level 1
Level 2
Level 3

This article has an associated Zaishen Challenge Quest.
Objectives[]
- Speak with Gron Fierceclaw in Doomlore Shrine when you are ready to begin this operation. (disappears from Quest Log after speaking to Gron)
- Rescue each member of Pyre Fierceshot's warband from the Cathedral of Flames.
- Rescue Seer Fiercereign.
- Rescue Cowl Fiercetongue.
- Rescue Roan Fierceheart.
- Slay Flamemaster Maultooth.
Obtained from
- Automatically added upon completing The Dawn of Rebellion
- After first completion, can be obtained from:
- Gron Fierceclaw in Doomlore Shrine
- Scrying Pool in Hall of Monuments (select "I seek guidance" option)
Requirements
Follow up
Rewards[]
Mode Experience
pointsVanguard reputation points First time Repeats Normal 2,500 1,500 2001 Hard 2,250 300
- 1 Only if below rank 8.
- Unlock Hero Pyre Fierceshot
Walkthrough[]
Speak to Gron Fierceclaw to initiate the quest and enter the cathedral.
Throughout this quest, you will find Charr Sentries, who use the monster skill Flame Call to summon Charr Hunter Beasts. The hunter beasts are fire elementalists who can deal large amounts of AoE damage, so killing the sentry quickly or interrupting Flame Call is recommended to avoid dealing with the hunter beasts.
You will also find Charr Prison Guards, warrior bosses who drop Prison Keys, which you need to open the Charr Prison Locks. Prison guards can be rather dangerous while they have Infernal Rage active, but this can be handled either by ending the stance or using a variety of anti-melee skills.
Charr Dominators carry Resurrection Chant and aren't shy about spamming it. It can be essential to target them first, even before healers, especially when a group has multiple dominators.
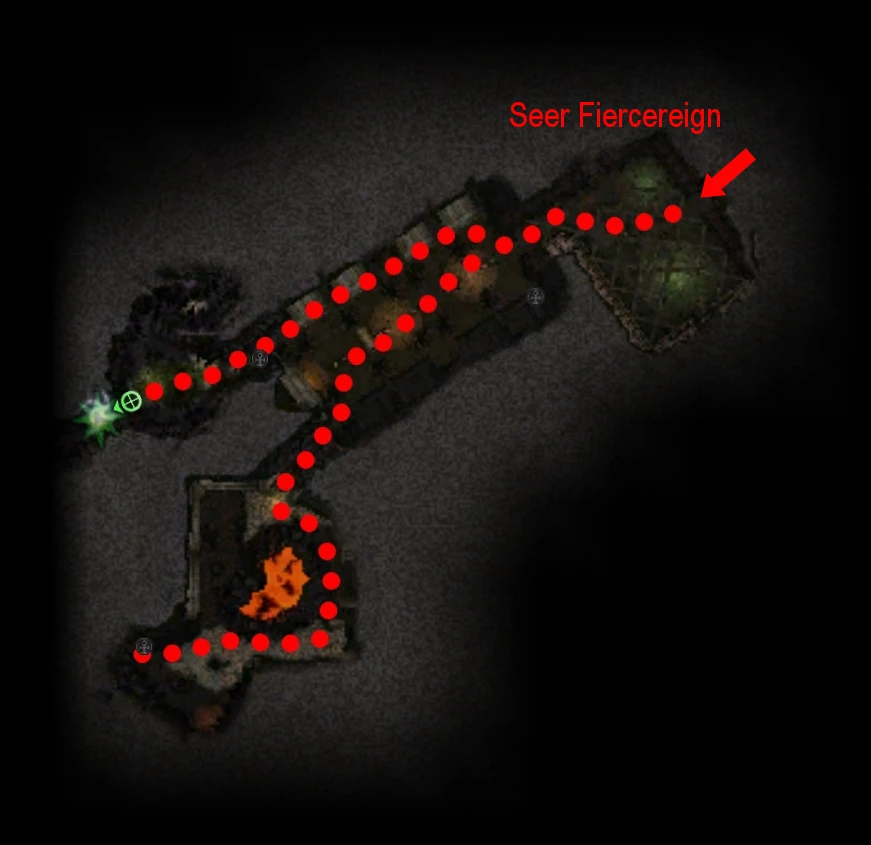
Level 1[]
Fight through this room and the large hall until you find the first Charr Prison Guard in the northeast. While you can sneak past several groups to get to the prison guard, when aggroed, the guard will run through the other groups and try to get you to chase through them, aggroing them all. Past the locked door behind him, you will see a group of Charr spellcasters, who run away as you approach. Do not chase them, as a group of Charr Axemasters and Charr Seekers will run up from behind them. After killing all the Charr in the room and rescuing Seer Fiercereign, head back through the large hall and through the left exit to find the portal to the next level.
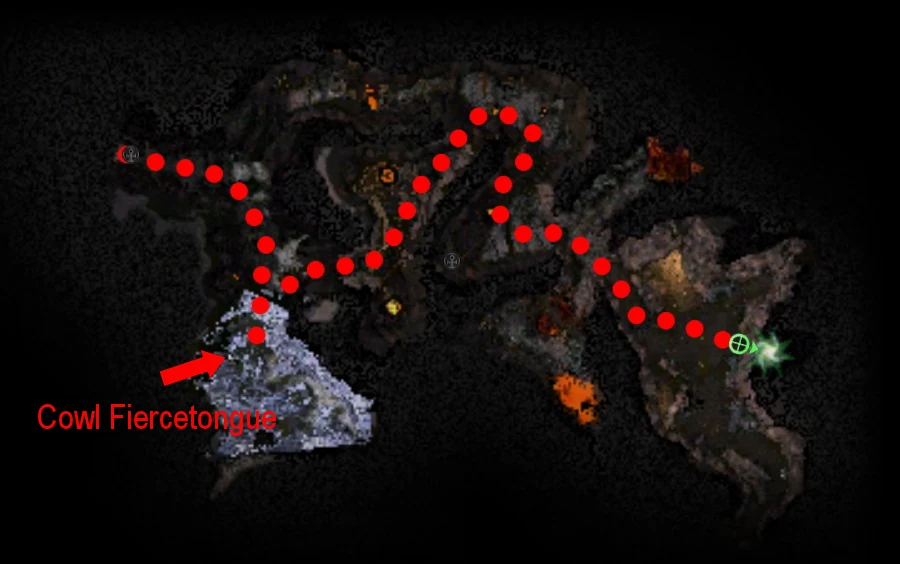
Level 2[]
The first cavern on this level is relatively crowded, so pull mobs carefully to avoid being overwhelmed. After rescuing Cowl Fiercetongue, two gates will open off of the main chamber, one to the north and one to the east. Both lead to the same place, and while the eastern path is shorter, the northern path allows for easier aggro management at the point where they meet.
The final room of this level is a cavern populated by spiders, with an open portal to the next level past the boss Jadam Spearspinner. Rushing past them isn't really an option, as they can cripple you with Snaring Web. Also, for every visible spider, at least two more will pop up, and when you attack Jadam, a large group of lower-level Spiders will spawn to the south. The safest tactic is to carefully clear the room up to Jadam, then run past her and the remaining two spiders to the portal.
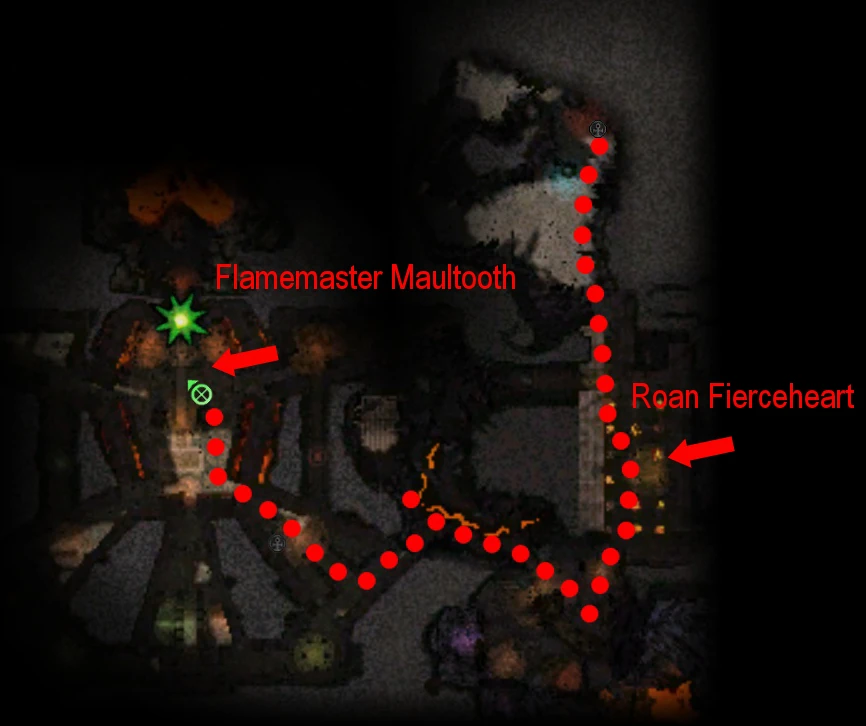
Level 3[]
The second chamber contains a number of nearby groups, much like the first chamber of the previous floor. In the middle of this room is Roan Fierceheart, the final member of Pyre's warband. Follow the path past a couple more prison guards until you enter the cathedral itself. The third prison guard on this floor will run away when initially aggroed, and try to drag you through two pop up groups of Magma Blisters, so it may be best to just let the guard run away.
The main chamber contains the end boss, Flamemaster Maultooth, as well as many groups of two or three Charr. Killing Maultooth ends the mission, but coming near him causes the various other groups of Charr to rush into the room, as and also causes two powerful Charr Effigies to pop up. You can try to quickly rush in and kill Maultooth, but may get overwhelmed by the other Charr. It's much safer to clear the other groups of Charr first, before Maultooth calls them all in.
Even after the various Charr groups rush in to help Flamemaster Maultooth, they will remain unlinked and can be pulled apart if needed. Charr Effigies are not linked to any other Charr. You can clear as much as you think necessary before going after Maultooth and trying to finish him quickly. After Maultooth is dead, a cutscene will play, and the party will be returned to Doomlore Shrine.
Hard mode[]
It's probably best to clear the room with the first prison guard before aggroing it, as this ensures that you won't have to fight another group while fighting the prison guard's group.
Early on the second floor, there are two groups of three Charr each that wander, then a stationary group of five Charr that includes a prison guard, a group of six Charr that wanders in small circles around the prison guard's group, and two other unlinked Charr standing there. It can be necessary to pull groups far apart to prevent a healer from another group from stepping up to heal and bringing its whole group into combat. This can be awkward at times, as your Charr allies aren't always inclined to follow you away from the mobs as you pull, so you may have to simply let them die at times in order to get a proper pull.
You can probably take on the first two groups on the second floor simultaneously, but the prison guard's group and the group of six that wanders near it should be taken separately. The other group will chase you much further than the guard's group, and as such, should be pulled first. If you can't aggro one group without the other, then aggro them both and run far away. The guard's group will turn back, leaving you with only the other group still following you.
At the north corner of the second floor, there is a group of three Charr and another group of six. Both have healers, and the group of six is all casters. The group of six can be a handful by itself, as it sometimes contains as many as three dominators who can and will resurrect their allies, so it is critical to separate the two groups. This may require pulling one group a lot further than you think is necessary before attacking, to prevent the other group from following to heal the first group. Immediately after this is another group of three Charr that wanders the same area as a group of six, and these two groups should also be pulled apart, but these are easier to clear, as they have no resurrection skills.
In the spider room, clear as far as you can without aggroing Jadam Spearspinner, and then try to run past to reach the third floor. Note that your Charr allies don't understand that you're trying not to aggro the boss, so they may well run ahead of you and aggro it even if your entire party stays out of aggro range. Flag your heroes with you as you try to run past, as otherwise, they'll stop to fight and be out of range to help if you die, leading to a wipe.
The twenty or so spiders that flood the room upon aggroing Jadam are all level 24, mostly linked to each other, and spam Barrage. If you don't make it past Jadam the first time you try, you'll have to clear these spiders to move on. Area of effect anti-martial weapon skills help immensely. You can also try to use the ramp down into the room to obstruct their shots while your party kills them with line of sight ignoring spells.
Trying to quickly kill Flamemaster Maultooth before clearing other nearby Charr probably isn't the best idea but can be done if your whole party attacks him in hard mode. Regardless, the end of the mission is pretty easy if you pull and clear the various Charr groups separately.
Creatures[]
NPCs[]
- Charr
- 20 (26) Pyre Fierceshot
- 20 (26) Roan Fierceheart
- 20 (26) Cowl Fiercetongue
- 20 (26) Seer Fiercereign
Monsters[]
- Charr
- 20 (26) Charr Blademaster
- 20 (26) Charr Axemaster
- 20 (26) Charr Seeker
- 20 (26) Charr Sentry
- 20 (26) Charr Prophet
- 20 (26) Charr Mender
- 20 (26) Charr Hexreaper
- 20 (26) Charr Dominator
- 20 (26) Charr Flameshielder
- 28 (30) Charr Effigy
- Elemental
- 20 (28) Charr Hunter Beast
- Ooze
- 24 (26) Magma Blister
- Spiders
- 24 (26) Needling Lavastrider (levels 2)
- 24 (26) Venomweaver (levels 2)
- 24 (26) Lifeweaver (levels 2)
- 24 (26) Painweaver (levels 2)
- 24 (26) Bloodweaver (levels 2)
Bosses[]
- Charr
- 24 (30) Charr Prison Guard (Eviscerate)
- 28 (30) Flamemaster Maultooth (Mind Blast)
- Spider
- 28 (30) Jadam Spearspinner (Stunning Strike)
Dialogues[]
Briefing from the Scrying Pool.
| Quest Log: | "Break into the Cathedral of Flames and free the captive members of Pyre's warband." |
| Rescue each member of Pyre Fierceshot's warband: | |
|---|---|
| Pyre Fierceshot: | "This is the Cathedral of Flames, a power base for the Shaman caste and their witless followers. The captive members of my warband should be inside." |
| Rescue Seer Fiercereign: | |
|---|---|
| Seer Fiercereign: | "Did you bring these human slaves to carry your pack, Pyre? Or are they lunch?" |
| Pyre Fierceshot: | "Times have changed, Seer. These humans help us of their own free will." |
| -OR- | |
| Gwen: (if in party) | "Slaves? You brutal animal! All you can do is bite the hand that rescues you!" |
| Seer Fiercereign: | "So it seems we fight together. Cowl and Roan are held further below. Let's not waste any more time." |
| Rescue each member of Pyre Fierceshot's warband: | |
|---|---|
| Pyre Fierceshot: | "Judging by these tracks, one of my warband is being held to the south. Head that way, human. Quietly!" |
| Rescue Cowl Fiercetongue: | |
|---|---|
| Pyre Fierceshot: | "Cowl Fiercetongue, you mangy mess! I thought for sure the Shaman would have killed you by now!" |
| Cowl Fiercetongue: | "They wanted to make a grand spectacle of my execution, otherwise, I would have been slaughtered days ago." |
| Pyre Fierceshot: | "It's lucky you're still wearing your pelt. Now let's find Roan and get out of here." |
| Rescue Roan Fierceheart: | |
|---|---|
| Pyre Fierceshot: | "Roan! And here I looked forward to selling the armor off your corpse." |
| Roan Fierceheart: | "Another day, Pyre. Flamemaster Maultooth, the hierophant's torturer, is nearby. Maultooth's doorguard possesses keys to the inner temple." |
| Pyre Fierceshot: | "Good. They'll soon learn their gods are false when they reach the afterlife." |
| -OR- | |
| Gwen: (if in party) | "What are we waiting for? I want to bury my sword in the heart of this Maultooth." |
| Slay Flamemaster Maultooth: | |
|---|---|
| Pyre Fierceshot: | "You should have killed us when you had the chance. We won't make the same mistake." |
| Flamemaster Maultooth: | "What a pathetic excuse for a rescue party. You should have sent an army. Prepare for your demise, worms! Release the effigies." |
| Pyre Fierceshot: | "Your Shaman tricks don't scare us, Maultooth. Let's finish this!" |
Cutscene 1[]
| Questions and Answers | |
|---|---|
| Pyre Fierceshot: | "You have freed my warband." |
| Gwen: | "And now that we have, you don't need us anymore, right?" |
| Pyre Fierceshot: | "I made a bargain, I shall keep it." |
| <party leader>: | "So the Charr do have honor." |
| Pyre Fierceshot: | "Honor be damned. A poor warrior abandons his best weapons." |
| Pyre Fierceshot: | "Gron, what have you brought for us?" |
| Gron Fierceclaw: | "You missed this one the first time through. You're getting sloppy." |
| Torg Bloodspine: | "You and your pets will pay for this, Fierceshot." |
| Pyre Fierceshot: | "Probably, but not today. Where are the humans?" |
| Torg Bloodspine: | "Why should I tell you, traitor?" |
| Pyre Fierceshot: | "I'll hobble you. I'll stake you out in the sun. Then I'll turn you over to the mouse, here. She likes to hurt Charr." |
| Gwen: | "Just give me half a chance." |
| Torg Bloodspine: | "The meat . . . the humans . . . are in the south, in the Sacnoth Valley. The Hierophant means to feed them to our new gods." |
| <party leader>: | "Those are not gods." |
| Torg Bloodspine: | "Do you think we care? What matters is that others think they are." |
| Pyre Fierceshot: | "I know the valley he speaks of. Have you heard enough?" |
| <party leader>: | "More than enough." |
| Torg Bloodspine: | "Then release me. I'll head north, away from here. I want no part of your petty vengeance." |
| Pyre Fierceshot: | "You forget." |
| Pyre Fierceshot: | "YOU are part of my petty vengeance." |
| Gwen: | "You killed him. Even though he told you what we wanted to know." |
| Pyre Fierceshot: | "He tried to bargain from a position of weakness. He was a fool." |
| Gwen: | "You are savage, treacherous animals!" |
| Pyre Fierceshot: | "You know nothing of my people." |
Notes[]
- As with all Charr in Eye of the North, nearly all the damage you receive will be fire damage, so taking fire-based protection (such as Mantra of Flame and Ward Against Harm) is well advised.
- Although they don't actually take up inventory space, having a full inventory will prevent you from picking up a Prison Key.
- Charr Prison Guards can be resurrected by other Charr and will drop another key when you kill them again, but this key will not add to your total.
- This mission is very useful to farm Superb Charr Carvings, as almost all the enemies are Charr.
Trivia[]
- The quest is probably a reference to the book and television mini series Band of Brothers, which in turn comes from a speech delivered by Henry V of England before the Battle of Agincourt in William Shakespeare's Henry V; Act IV, Scene 3.
| Eye of the North storyline quests |
|---|
Ebon Vanguard: Against the Charr → Warband of Brothers → Assault on the Stronghold Asura: Finding the Bloodstone → The Elusive Golemancer → Genius Operated Living Enchanted Manifestation Deldrimor: Destruction's Depths → A Time for Heroes |