| Vloxen Excavations | ||||||||
|---|---|---|---|---|---|---|---|---|

| ||||||||
| Basic Info | ||||||||
| ||||||||
| Neighbor(s) | ||||||||
| Umbral Grotto, Vlox's Falls | ||||||||
| Map | ||||||||
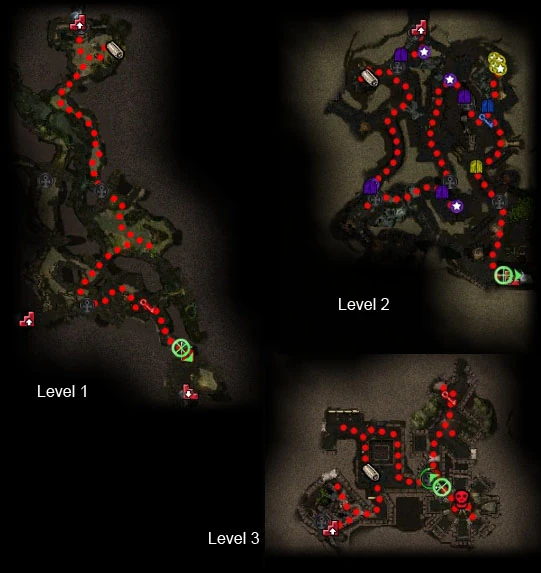 (click to enlarge) | ||||||||
General Description[]
Vloxen Excavations consists of 3 levels. The first level features groups of various plants, oozes, and Stone Summit. This level is passed through during the primary quest The Knowledgeable Asura. The second level begins with Stone Summit members and ends with various groups of Undead. These undead revive after a short time so do not linger after defeating a group. The final level is very small containing only undead and the boss Zoldark the Unholy and his group of Minions of Zoldark.
Getting There[]
Direct access from Umbral Grotto or Vlox's Falls. If you enter from Vlox's Falls you can skip a large part of the first level.
Quests[]
Dredging the Depths![]() from Molenin in Umbral Grotto
from Molenin in Umbral Grotto
NPCs[]
- Collectors:
- Various:
 24 Dredge Slave
- 20 Doff
Allies[]
Revealed by Light of Deldrimor:
Level 1
- Hidden Treasure:
- near Stone Summit Emblem Collector
- near the Shrine in the south
- near the boss with the key
- 24 Dwarven Ghost ally:
- near the Area Map
- near the Shrine on east side
- near the Shrine by exit to Vlox's Falls
Level 2
- Hidden Treasure:
- at the bottom of the stairs when you first walk in.
- near the area map.
- on path between southern gear box and Area Map
- in powder keg room
- just south of Dungeon gate (Same spot as Dwarven Ghost)
- 24 Dwarven Ghost ally:
- at the Shrine near above mentioned gear box
- far south-west up metal pathway
- just south of Dungeon gate (Same spot as Hidden Treasure)
Level 3
- Hidden Treasure:
- near the starting point.
- two, in compass distance from starting zone.
- center-east of the corridor with the boss key.
- 2, near the final chest, in the nearest alcoves.
Bestiary[]
Monsters[]
- Ooze
- 20 Aggressive Ooze
- 20 Ominous Ooze
- 20 Shimmering Ooze
- 20 Earthbound Ooze
- Plants
- 20 (26) Cave Ayahuasca
- 15 (25) Parasitic Growth
- 20 (26) Cave Aloe
- 20 (26) Corrupted Aloe
- 20 (26) Fungal Bloom
- 10 (24) Fungal Spore
- Skelks
- 24 (26) Skelk Rampager
- 24 (26) Skelk Corrupter
- 24 (26) Skelk Slasher
- Spiders
- 24 Venomweaver
- 24 Lifeweaver
- 24 Bloodweaver
- Stone Summit
- 24 Panicked Stone Summit Dwarf
- 24 Stone Summit Carver
- 24 Stone Summit Crusher
- 24 Stone Summit Taskmaster
- 24 Stone Summit Warder
- 24 Stone Summit Ranger
- Stone Summit Gatekeeper
- 24 Stone Summit Healer
- 24 Stone Summit Gnasher
- 24 Stone Summit Sage
- 24 Stone Summit Demolisher
- Undead
- Other
- Stone Summit (Hard mode only)
Bosses[]
Boss-like foes[]
Rewards[]
- When opened, Zoldark's Chest spawns 1 item for each player (2 in Hard Mode)
- Items rewards may be:
- A Unique item exclusive to this chest:
- A gold item
- Rare crafting materials
- A Mantis Dreamweaver Polymock Piece
- 1500 Dwarven reputation points (2250 in Hard Mode) for a first time completion, and half the points for repeats.
Tips on defeating Zoldark[]
- Though Zoldark does attack, the main threat comes from his several monster specific skills to buff his group of 6 Minions of Zoldark. He doesn't heal and takes very little damage even from degen. The key to defeating him is to continually kill his minions (AoE damage is ideal for this), as once they are dead, he uses a skill that allows him to simultaneously resurrect all six of his minions at a cost of a 5% health sacrifice. Eventually he will sacrifice himself to near death, at which point he will stop animating his minions. When this happens, concentrate on Zoldark and finish him.
- Note that if his Master of Necromancy runs out and he has no more minions, he will lose all the life he gained from that skill. This can often kill him when he is near death.
- Also, if killing him by the techniques above, its a good idea to stand near Zoldark, so that he also takes damage from your party's AoE damage.
- Zoldark will not regenerate health, he lacks even natural regeneration. This makes him much easier to kill if you even have a high death penalty.
Notes[]
- Watch out for a rolling boulder on the first level.
- If your party dies when fighting the elevated Stone Summit Rangers in Level 2, you are resurrected at the start of the level.
- The Ancient Undead on level 3 automatically resurrect after a few minutes but will disappear after Zoldark is killed. Avoid them if possible; you gain no reputation points nor experience from foes who have resurrected.
- Some areas in this dungeon are the same as in the Ooze Pit.
- The lever in the north easternmost part of level 3 switches off some of the poison traps on that level.
- Taking a minion master seems not to be the best idea for this dungeon as minions will frequently be taken from you by enemies.
- For HM, like in Slavers' Exile, take Frozen Soil to deal with the Stone Summit Dwarves (FS does not prevent Zoldark from resurrecting his minions).
Trivia[]
This dungeon has several references to the first Indiana Jones movie, Raiders of the Lost Ark from 1981:
- The rolling boulder is a reference to the opening sequence
- When getting the Area Map for the second level, there are several Chromatic Drakes protecting it. The party's leader says, "Drakes. Why did it have to be drakes?" – a mimicked line from when Indiana Jones becries, "Snakes. Why did it have to be snakes?"
- Taskmaster Bellok likely refers to René Belloq, Indiana Jones' main rival.