m (Protected "Urgoz's Warren (mission)" ([edit=autoconfirmed] (indefinite) [move=sysop] (indefinite))) |
|||
| (43 intermediate revisions by 28 users not shown) | |||
| Line 1: | Line 1: | ||
| + | {{notice|<big> For more information and documentation, please see [http://www.guildwiki.org/Urgoz's_Warren_(mission) this]. This is a fanfic page.</big>}} |
||
| + | |||
{{Location Info|title = Urgoz's Warren}} |
{{Location Info|title = Urgoz's Warren}} |
||
| − | [[Urgoz's Warren]] is an [[Elite Mission]] accessed from the [[Kurzick]] capital [[House zu Heltzer]]. This area is home to [[Urgoz]], a forest guardian who is now corrupted and threatens all life in the [[Echovald Forest]]. The objective of this mission is to destroy him. |
+ | [[Urgoz's Warren]] is an [[Elite Mission]] accessed from the [[Kurzick]] capital [[House zu Heltzer]]. This area is home to [[Urgoz]], a forest guardian who is now corrupted and threatens all life in the [[Echovald Forest]]. The objective of this mission is to destroy him, by using your knowledge, skills, weapons, and other things at your disposal. |
To Access this mission, see the [[Elite Mission]] article. |
To Access this mission, see the [[Elite Mission]] article. |
||
== Mission Objective == |
== Mission Objective == |
||
| + | *Kill [[Urgoz]]. <small>Simple, right? However, you have to go through trial and error to get to him.</small> |
||
| − | *Kill [[Urgoz]]. |
||
== General Area Description == |
== General Area Description == |
||
| − | [[Image: |
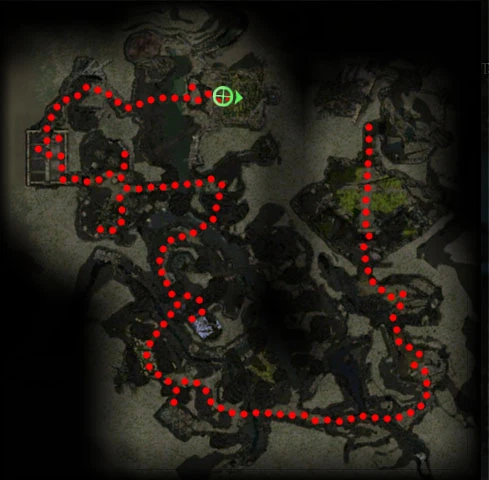
+ | [[Image:Urgozmap.jpg|right|thumb|Map of Urgoz's Warren]] |
| − | + | [[Urgoz's Warren (mission)]] |
|
| − | *Much of Urgoz's Warren has the same look and feel as [[Echovald Forest]]. |
||
| − | *Party size is 12. |
||
| − | *If a party dies, it is returned to [[Urgoz's Warren (Location)]]. |
||
| − | *Because of the large [[aggro]] that takes place in many situations, [[Area of Effect|AoE]] skills are very effective in this area. This includes offensive and defensive skills. Offensively, skills (and character builds) that are aimed at damaging multiple foes ([[Meteor Shower]], [[Spiteful Spirit]], etc.) are quite effective. Likewise, defensively, group protection spells ([[Aegis]] and [[Ward]]s) and healing ([[Heal Party]]) pay great dividends, especially since the party size is 12. |
||
| − | *[[Sweep]]ing is an absolute must, especially for a party that is new to the Warren. Monsters popping out of nowhere is "the name of the game" here. |
||
| − | *Urgoz's Warren has a lot of surprises; patience is key. |
||
| − | *Most areas within the Warren will have a negative [[Environmental effect]] that is in place due to a [[Twisted Bark]]. Eliminating these creatures will remove the environmental effects. |
||
| − | *Each area will have a locked gate at the end. These gates can only be opened by slaying the [[Guardian Serpent]] which is in front of them. |
||
| − | *A necromancer with a [[sacrifice]] skill combined with another party member who has [[Rebirth]] or a necromancer with a ''teleportation'' skill ([[Necrotic Traversal]] or [[Consume Corpse]]) is necessary to get past a certain area in the Warren. (This is not a bug. Direct questioning of the designer of Urgoz's Warren confirms this is intentional.) |
||
| − | *This area is vast and the amount of monsters lurking here make it a long fight to the finish. If your party is mostly new to the area make sure you have AT LEAST 5 HOURS to devote to this mission before entering. The biggest cause of failure isn't death by monster but by leaving party members. With a good build and an experienced team it is possible to do in 2 hours. Less than 2 hours is also possible but much more difficult. |
||
| + | Much of Urgoz's Warren has the same look and feel as [[Echovald Forest]], because it is managed, owned, and maintained by the Kurzicks. They have to make sure they get their troops up to speed to fight and kill those Luxons, of which so many call "Suxons". They only allow in 12 at a time into this Elite area. So if you plan to go, make sure you have a full party of twelve that can deal, heal and survive a lot of damage. If you do not have what it takes, you are some how returned back to the area that they call "outpost". |
||
| ⚫ | |||
| + | [[Sweep]]ing is an absolute must. It is where you earn your wisdom and get rewards for cleaning out everything. Remember, it is wise to be patient and pull. Do not take a lot of groups, you will not survive. There are points where you will feel "exhausted". Take out all that you can, especially the nasty ugly twisted up trees. These trees, once dead, will enable you to feel "young" again. Don't worry about the locked gate, it'll open after you slay everything or at least the ugly serpants. |
||
| − | === Area 1 (Weakness) === |
||
| − | '''[[ |
||
| − | [[[[YOU NEED ASSASSINS]]]] |
||
| − | ]]'''[[Image:Urzogz warren start.jpg|thumb|200px|right|Fighting a pulled Dredge group in the corridor]] |
||
| − | After you spawn, immediately back up to the doors behind you. Once back have one person sweep ahead to the end of the narrow corridor. Two groups of [[Hopping Vampire]]s and [[Thought Stealer]]s will spawn. The first one (just 4) in front of doors, the second one (eight) where everyone spawned in. The Thought Stealers drain all of their victim's energy as they die and the Vampires drain all of a player's life as they die. Dodge the vampires at all cost. |
||
| + | It may take a while to finish this mission, but it's not too bad with new ramps and full hero parties now available. |
||
| − | Pull the ones at the spawn point (having traps waiting for them to ensure they don't suicide and kill anyone), once they are all dead pull the second group. |
||
| ⚫ | |||
| − | Past that spawn will be a clearing with the [[Twisted Bark]] in the middle and swarms of [[Dredge]] running arround. While camping in the corridor, continue to pull single groups and dispatch them. Once all the groups are gone, move in to kill the Twisted Bark. |
||
| + | '''This can be found on GuildWiki.Org''' |
||
| ⚫ | |||
| − | Proceed forward to the stairs and pull the Dredge group in the center to kill them. Then, have one person walk just inside the door so that groups to the right and left come toward the [[Guardian Serpent]]. Pull the groups one at a time before taking out the guardian to open the door to the next area. Be mindful that if your party strays into the right or left corridors, there will be a big spawn of [[Greater Blood Drinker]]s. Only go there if there is a chest and with careful sweeping. |
||
| + | '''To see the full list of Monsters, please visit Guildwiki.Org''' |
||
| + | [[Category:Fanfic]] |
||
| − | === Area 2 (Life Drain) === |
||
| − | In this area, all party members will be affected by [[Life Drain]] until the Twisted Bark is killed. Stay outside of the area and send in one person to pull the Dredge. The puller may need a [[Monk]] to be with him to keep him alive as he pulls the Dredge groups. When the area is clear of Dredge, regroup and regenerate before taking out the Twisted Bark. |
||
| − | |||
| − | Do note that the room containing the Twisted Bark is filled with Greater Blood Drinker pop-ups. No less than 5 or 6 groups of 4 each. Sweep carefully and slowly, then head down the right tunnel (a spawn there too) to eliminate the Guardian Serpent. |
||
| − | |||
| − | === Area 3 (Locked Gate) === |
||
| − | This area has no negative environmental effect. Pull and eliminate the large groups of [[Brooding Thorn]]s and [[Burning Brush]]es. After those, you will see a bridge ahead with a swarm of Dredge on it. The safest way to tackle them is to actually have all party members run underneath the bridge (the Dredge damage dealers are [[Ranger]]s who need [[line of sight]]). Have everyone continue to use offensive spells until all the Dredge are dead. |
||
| − | |||
| − | It is '''important''' to note that the teleporter in this area works in only one direction, as all teleporters do. The origin is ''above'' the ground level, on the bridge, and the destination is at ground level, in the main area. The teleporter cannot be used to gain access to the bridge, only to leave the bridge and return to the main floor of the room. A party member must, by design, have a corpse teleportation exploit in order to reach the bridge. If no one in the party has such a spell with them, the party will remain stuck and cannot proceed. Thus either [[Necrotic Traversal]] or [[Consume Corpse]] are required skills. |
||
| − | |||
| − | Once accomplished, the party's necromancer must activate a corpse exploit to reach the bridge. The party member on the bridge can then unlock the door (there is a lock on either side of the gate), then use the teleporter to return to the party. |
||
| − | |||
| − | === Area 4 (Fire Flower Corridor) === |
||
| − | [[Image:Urzogz warren fire flowers.jpg|thumb|200px|right|The Fire Flower bridge]] |
||
| − | [[Image:Urzogz warren thorn walls.jpg|thumb|200px|right|Vine Gates]] |
||
| − | This area is composed of a dark tunnel with a long winding bridge surrounded on both sides by [[Fire Flower]]s (they will appear in yellow text). As soon as someone begins to cross the bridge the Flowers act as turrets shooting arrows that cause minor damage, but also inflict [[burning]] and [[cripple]]d. At three points on the bridge, [[Thorn Wolf|Thorn Wolves]] will spawn (they are powerful [[Assassin]]s). |
||
| − | |||
| − | At the end of the bridge, a spawn of [[Hopping Vampire]]s and [[Thought Stealer]]s will be waiting (with a similar invisible spawn waiting at the start of the bridge for those who try to run away). Trapping before they spawn will help slow them down. |
||
| − | |||
| − | === Area 5 (Exhaustion) === |
||
| − | Unlike other effects, the [[Sheer Exhaustion]] effect will only be in the area of the Bark and not throughout the whole area. This area will start out with a clearing. This clearing is filled with several [[Thorn Wolf]] pop-ups. Carefully sweep and clear it. At the end of the clearing will be three possible routes, each having a vine gate that opens and shuts periodically. The one in the center leads to the Twisted Bark of this area. The Bark will be in a clearing with [[Brooding Thorn]]s in the back but once again with lots of Thorn Wolves hidden. Pull foes outside the exhaustion radius and clear the area before tackling the Twisted Bark. |
||
| − | |||
| − | After clearing that area, either backtrack to the previous area and go through the left vine gate there, or clear the Twisted Bark area of all pop-ups and head out through the left vine gate there. In both cases, you will be traveling in a cave passage, again with lots of pop-ups. After passing through a few more vine gates, you'll enter an area that has grass (and more pop-ups), similar to the room with the Twisted Bark. Go right from there to get onto a high bridge. Go over the bridge into another chamber with vine gates (and Thorn Wolf spawns). From that chamber, head right (downwards), until you get to a narrow bridge with a Guardian Serpent at the end. |
||
| − | |||
| − | ''Warning: Do '''not''' head for the Guardian Serpent right away.'' |
||
| − | |||
| − | If the whole party crosses the bridge together, several very large groups of high-level [[Warden]]s will spawn. Each group can have 8 to 10 Wardens, and will bodyblock the way back, wiping the whole team. Instead, send just one player to take out the Guardian. Even after doing that, do not cross right away. See the description for the next area. |
||
| − | |||
| − | === Area 6 (Energy Draining) === |
||
| − | While in this area, all party members will have -4 energy regeneration. This means that most classes will have zero energy regeneration while some (like [[Warrior]]s) will even suffer energy loss. |
||
| − | |||
| − | The area past the bridge will be empty, but the party cannot all go in. If at least one stays behind, the area will remain empty until those that went in can find and kill the Twisted Bark. This will eliminate the energy degeneration and make things easier. After this, they need to eliminate the Guardian Serpent to open the way to the next area. They must then cross the bridge past the guardian and wait on the other side. |
||
| − | |||
| − | Those that were left behind in the previous area can then proceed to rejoin their group. Ensure that the first group have made it past the second bridge. |
||
| − | |||
| − | === Area 7 (Exhaustion and Weakness) === |
||
| − | The next area will not have negative effects right away, this will allow the party to draw the large groups of Brooding Thorns and Burning Brushes away from the negative effect area to tackle them. After they are dispatched, the way will be clear to the Guardian Serpent. However, it would be foolish to proceed immediately because the Exhaustion effect will last into the final area where [[Urgoz]] is located. |
||
| − | |||
| − | There are two Twisted Barks, one on the left and one on the right. The one on the left (atop a small hill) is the one responsible for the Exhaustion effect. The way to this Twisted Bark is guarded by two large groups of Maddened [[Warden]]s and then the Twisted Bark itself is guarded by a large group of Burning Brushes and Brooding Thorns. |
||
| − | |||
| − | The party may try to lure it to them by attacking the Brushes from beneath and force the Bark to come closer to heal them. However, the Brushes may run back and around to try and get to the party (they won't make it all the way around). |
||
| − | |||
| − | If the party relies on the [[attack]] damage (rather than [[spell]]s or [[trap]]s), then they may also need to repeat and take out the Twisted Bark on the right, which causes the Weakness effect. |
||
| − | |||
| − | === Area 8 (No effect) === |
||
| − | This area has no effect, but the effects from the previous area (if still present) carries over into it. It is comprised of a small rectangular room filled with Maddened Wardens, Burning Brushes and Brooding Thorns. |
||
| − | |||
| − | ''Note: Currently, the Burning Brush and Brooding Thorns are bugged and will not move unless they are "unstuck" by triggering the "ADoT flee" behavor. Brooding Thorns will attack and try to heal and lay traps, while Burning Brush will cast its AoE spells if players run next to it. Attack them with ranged weapons and spells to dispatch them easily.'' |
||
| − | |||
| − | The room has 4 distinct groups of Wardens. Observing their motions should help the [[pull]]er recognize when and which Wardens to pull. Using [[trap]]s and careful pulling, each group can be taken out easily. |
||
| − | |||
| − | After dispatching the Wardens and any Brushes/Thorns in the way, kill the Guardian Serpent to advance. |
||
| − | |||
| − | === Area 9 (No effect) === |
||
| − | This small area consists of only one clearing with a scenic waterfall and appears to contain only a few Greater Blood Drinkers and a group of Thorn Wolves. Be warned however, the room is also filled to the brim with hidden groups of Thorn Wolves and Greater Blood Drinkers. |
||
| − | |||
| − | ''Warning: Make sure that your entire party does '''not''' enter the chamber, because the gates will shut as soon as your whole party is through. The hidden groups will spawn and the large numbers will easily crush the party.'' |
||
| − | |||
| − | Carefully sweep and pull back group after group. These pop-up groups will continue to spawn for a very long time. It is not safe for your whole party to enter the chamber until you see the door at the other end open, which would indicate that only a few groups are left. |
||
| − | |||
| − | === Urgoz's Sanctum(Life Drain/Energy Drain) === |
||
| − | [[Image:Urgozs_Sanctum1.jpg|right|thumb|200px|Bridge to Urgoz's sanctum]] |
||
| − | [[Image:Urgozs_Sanctum2.jpg|right|thumb|200px|Urgoz with the two Greater Serpents]] |
||
| − | |||
| − | Before entering Urgoz's inner sanctum there is one Twisted Bark that maintains a Life Drain effect. There is no hidden monster guarding it; the party can just quickly rush in and finish it. |
||
| − | |||
| − | There are three entrances into this chamber each guarded by a Guardian Serpent. Urgoz will begin to talk to the party telling them that their arrival was foretold and that their defeat is certain. |
||
| − | |||
| − | If the party takes the path straight to Urgoz, they will come to a bridge and then engage a group of Burning Brushes and Brooding Thorns. Dispatching them should be a walk in the park compared with what the party has been through. |
||
| − | |||
| − | Once inside Urgoz's inner sanctum, the party will see Urgoz flanked by two [[Greater Serpent]]s. These two Serpents will not heal Urgoz but will heal each other. It is common for parties to just ignore them and directly attack Urgoz. |
||
| − | |||
| − | The battle offers the following challenges to the party: |
||
| − | *He will spam (literally) the special attack [[Forest's Binding]], which puts the hex [[Binding Chains]] on whomever he attacks. This will severely slow party members and make them unable to attack. This greatly inhibits [[Warrior]]s, [[Ranger]]s, and [[Assassin]]s. |
||
| − | *Urgoz's attack range is very long. It can strike anyone in the radius of a radar compass around him. |
||
| − | *[[Explosive Growth (Monster)|Explosive Growth]]s will sprout around every player in Urgoz's radar range every 4-5 seconds. The longer the player stays in one spot, the larger the size of the spawn. These creatures will explode after 9-10 seconds of sprouting and cause 300+ damage to anyone adjacent to them (the damage decreases as players move further away from them). The prolonged [[knockdown]] the explosions cause can make it almost impossible to avoid subsequent ones. Players must constantly be moving. In general, doing two actions in a row (such as casting two spells, or attacking then casting) will almost guarantee that the player is surrounded by 2-3 growths. |
||
| − | *The water around Urgoz is [[Defiled Water]]. It makes [[condition]]s last longer. |
||
| − | *The combination of Binding Chains and the Explosive Growths is very dangerous. A character moving at 10% speed can barely walk out of the explosive radius. |
||
| − | *[[Hex]] removal can counter it, but its application should be wisely decided as Urgoz is quick to inflict it again. |
||
| − | *The right side (from the entrance) of the room has the same effect as a previous room, but without the -4 energy degeneration. It is advisable to stay out of this area for obvious reasons (only if the party did not kill the Twisted Bark in Area 6). |
||
| − | |||
| − | Generally helpful strategies against the Greater Serpents and Urgoz include consistent, heavy degeneration in a hit-and-run style. |
||
| − | |||
| − | '''Alternate Strategy:'''<br> |
||
| − | Another strategy is based on the fact that Urgoz is a [[plant]], just like those Explosive Growths he spawns. The strategy is to place the spirit [[Edge of Extinction]] and have players run around causing as many of the Explosive Growths as possible to spawn. As Urgoz is of the same species as the Growths, he will take damage every time one dies (make sure Urgoz is within the spirit's range). One good location is just to the left of the entrance, by the left Guardian Serpent's door (make sure it is dead first). But be warned that killing Explosive Growths mean detonating them. So it will be harder to dodge them. |
||
| − | |||
| − | You should also have a few [[Fire Magic|fire]] [[Elementalist]]s [[nuke|nuking]] the Growths between moving and dodging. Party members should also help out in damaging [[Urgoz]]. Between the damage from [[Edge of Extinction]] and the party members, [[Urgoz]] should fall quite easily. |
||
| − | |||
| ⚫ | |||
| − | [[Dredge]] |
||
| − | *{{a}}24 [[Dredge Gutter]] |
||
| − | *{{Mo}}24 [[Dredge Gardener]] |
||
| − | *{{w}}28 [[Maddened Dredge]] |
||
| − | *{{r}}28 [[Maddened Dredge Savage]] |
||
| − | *{{rt}}28 [[Maddened Dredge Seer]] |
||
| − | [[Plant]]s |
||
| − | *{{x}}10 [[Explosive Growth (Monster)|Explosive Growth]] |
||
| − | *{{x}}30 [[Urgoz]] |
||
| − | *{{r}}28 [[Brooding Thorn|Brooding Thorn / Thorns]] |
||
| − | *{{mo}}28 [[Uprooted Malice]] |
||
| − | *{{mo}}30 [[Twisted Bark]] |
||
| − | *{{e}}24 [[Burning Brush]] |
||
| − | *{{a}}28 [[Thorn Wolf]] |
||
| − | [[Vampire]]s |
||
| − | *{{n}}10 [[Hopping Vampire]] |
||
| − | *{{n}}10 [[Thought Stealer]] |
||
| − | [[Warden]]s |
||
| − | *{{a}}28 [[Maddened Thorn Warden]] |
||
| − | *{{e}}28 [[Maddened Earth Warden]] |
||
| − | *{{me}}28 [[Maddened Mind Warden]] |
||
| − | *{{mo}}28 [[Maddened Song Warden]] |
||
| − | *{{r}}28 [[Maddened Wind Warden]] |
||
| − | *{{rt}}28 [[Maddened Spirit Warden]] |
||
| − | *{{w}}28 [[Maddened Forests Warden]] |
||
| − | [[Wurm (Species)|Wurm]]s |
||
| − | *{{mo}}28 [[Guardian Serpent]] |
||
| − | *{{mo}}30 [[Greater Serpent]] |
||
| − | Other |
||
| − | *{{n}}28 [[Greater Blood Drinker]] |
||
| − | {{bug|A disconnect or crash during mission may place you at the mission staging area with no NPCs, no other players, no mission screen, nor any way to enter or continue the mission.}} |
||
| − | [[Category:Elite Missions]] [[Category:Factions missions]] |
||
Revision as of 20:07, 29 March 2012
| NOTE: For more information and documentation, please see this. This is a fanfic page. |
This is a mission entry. For information on the location Urgoz's Warren, see Urgoz's Warren (location).
Urgoz's Warren is an Elite Mission accessed from the Kurzick capital House zu Heltzer. This area is home to Urgoz, a forest guardian who is now corrupted and threatens all life in the Echovald Forest. The objective of this mission is to destroy him, by using your knowledge, skills, weapons, and other things at your disposal.
To Access this mission, see the Elite Mission article.
Mission Objective
- Kill Urgoz. Simple, right? However, you have to go through trial and error to get to him.
General Area Description
Map of Urgoz's Warren
Urgoz's Warren (mission)
Much of Urgoz's Warren has the same look and feel as Echovald Forest, because it is managed, owned, and maintained by the Kurzicks. They have to make sure they get their troops up to speed to fight and kill those Luxons, of which so many call "Suxons". They only allow in 12 at a time into this Elite area. So if you plan to go, make sure you have a full party of twelve that can deal, heal and survive a lot of damage. If you do not have what it takes, you are some how returned back to the area that they call "outpost".
Sweeping is an absolute must. It is where you earn your wisdom and get rewards for cleaning out everything. Remember, it is wise to be patient and pull. Do not take a lot of groups, you will not survive. There are points where you will feel "exhausted". Take out all that you can, especially the nasty ugly twisted up trees. These trees, once dead, will enable you to feel "young" again. Don't worry about the locked gate, it'll open after you slay everything or at least the ugly serpants.
It may take a while to finish this mission, but it's not too bad with new ramps and full hero parties now available.
Area by Area Walkthrough
This can be found on GuildWiki.Org
Monsters
To see the full list of Monsters, please visit Guildwiki.Org