Fort Ranik Mission map
This is a mission entry. For information on the location Fort Ranik, see Fort Ranik (location). For information on the Pre-Searing location, see Fort Ranik (Pre-Searing).

This article has an associated Zaishen Challenge Quest.
Objectives[]
Retake the Great Northern Wall.
- Push back the invading Charr army.
- Locate the Restraining Bolt and return it to Siegemaster Lormar.
- Locate the Arming Crank and return it to Siegemaster Lormar.
- Locate the Release Lever and return it to Siegemaster Lormar.
- BONUS Rescue Deeter Saberlin from his Charr imprisonment.
Walkthrough[]
Primary[]
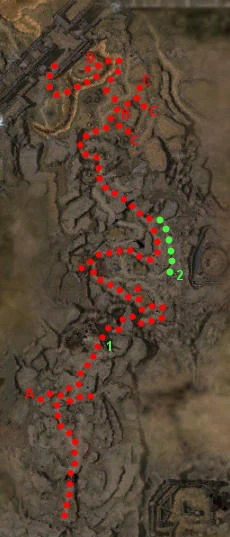
This mission is straightforward until you reach the trebuchet. Near the trebuchet (and conveniently within range of its fire) are large groups of Charr; rushing in and aggroing them would be suicide. Talk to Siegemaster Lormar (B on the map). He will tell you that the trebuchet is broken, but he can fix it if you bring him three working parts. Gather these parts from the wreckages (marked C on the map). You need to return the parts one at a time to Siegemaster Lormar. After all three parts are returned and the trebuchet restored, fire it and watch destruction rain upon the fifteen-strong group of Charr right below the ledge you are standing on. You only need to fire it once to continue to the next step. Note that Lormar will not speak to you until all the Charr surrounding him are killed.
The second trebuchet is working (point D on the map). If you fire it quickly, you may be lucky and kill the final boss, completing the mission. Otherwise, it's a case of luring out the Charr into the blast pit of the trebuchet. If you approach cautiously, staying out of aggro range, the groups will come to the blast pit and stay there long enough to eat fiery death. You can also attract the Charr into the area by ordering your henchmen there, and then firing the trebuchet. You will need to resurrect them afterwards.
Once you have a clear path to the wall, kill the Charr boss and his mob to end the mission and trigger the ending cut scene.
Bonus[]
You get the bonus objective from Master Armin Saberlin after you clear the initial Charr platoon (including a boss). If Saberlin does not survive, you will not see the bonus objective in your quest log, though you can still get the bonus, so do not worry too much on keeping him alive. The bonus objective is to rescue Trooper Deeter Saberlin from his cage at point 2 on the map. His cage is guarded by two Charr Overseers who use Heal Area to keep each other alive. There are many strategies for defeating them – fight them up close to benefit from their heals, hex them with Backfire to neutralize the healing effect, interrupt their heals with knockdown attacks or Power Leak (which you can obtain from Vassar in an early post-searing mesmer quest), or improvise your own strategy.
Hard mode[]
It's best not to rely on just one character for healing, as the Charr mesmers have power block, which can easily leave you with no healers.
Hex removal is very helpful. Lingering Curse used by the Charr necromancers will make it difficult to keep the party healed effectively. Disenchantment spells are also useful to remove Shield of Judgment, though it works almost as well to simply switch targets.
The bonus is most easily done by separating the two overseers. Keep most of the party back while one character runs up to them, then runs away a bit so that they follow, and then runs back toward them. It sometimes takes a few tries, but if they stop separated slightly (it doesn't have to be very far), they won't heal each other with heal area. If you don't bring a person with interrupts and/or daze these two monks may give you a headache. If using heroes, lock the interrupter on one monk and have every one else kill the other.
On areas with a "gauntlet" do not try running through the middle of them. Instead go the back path up the ridge and fight one group instead of getting hammered by two groups of Charr hunters.
Watch the patrol routes, as they can be complicated, however after you know them the first part especially becomes relatively easy. In particular, at the very start, don't run up to the NPC allies fighting some Charr, as a different group will come attack you. Hang back a bit and you only have to fight one group at a time.
Creatures[]
NPCs[]
Monsters[]
- Charr
 6 (23) Charr Axe Warrior
- 6 (23) Charr Blade Warrior
- 6 (23) Charr Warrior
- 6 (23) Charr Stalker
- 5 (23) Charr Martyr
- 6 (23) Charr Overseer
- 6 (23) Charr Ash Walker
- 8 (23) Charr Ashen Claw
- 6 (23) Charr Mind Spark
- 6 (23) Charr Fire Caller
- Devourer
- 4 (22) Carrion Devourer
- 3 (22) Plague Devourer
Bosses[]
- Charr
- 8 (26) Spar the Ravager
- 8 (26) Klaww FeatherStorm
- 8 (26) Rrrack Whitefire
- 8 (26) Roarst One Eye
- 8 (26) Craze the Unforgiving
- 8 (26) Torch Spitfur
Dialogues[]
Briefing from Lord Darrin.
Inside the mission[]
Ascalon Militia: The Charr have pushed past the cathedral. If we don't stop them, thousands of our countrymen will die.
Bonus objective:
Master Armin Saberlin: My son Deeter was carried off by the Charr after the first wave. Please find him. He's all I have left.
Finishing the bonus:
Trooper Deeter Saberlin: Help! The Overseers were too much for us! The Charr have slaughtered and carried off many of our friends. They must be stopped. I will report back to my father. If you can get to the trebuchets north of here perhaps there is hope.
Intermediate cutscene[]
Siegemaster Lormar: Damn Charr snuck up while I was repairing this trebuchet. It's missing a release lever, a restraining bolt, and an arming crank. Search the other wrecked trebuchets to find those three pieces, and bring them to me. If you do, I can fix this little lovely, and we'll give those Charr a taste of their own filth. To activate the trebuchet after it's fixed, pull the lever once to load it and once again to fire it. Anything under its blast will get blown to bits. But hurry. More Charr come through the Wall every minute.
Ending cutscene[]
Prince Rurik: The time for action has come. No more cowering behind this wall. From now on, we take the fight to our enemies.‘'
Ascalon Guard: Prince Rurik! Prince Rurik!
Prince Rurik: What is it?
Ascalon Guard: Prince Rurik. We are victorious, but it has cost us greatly. During their retreat the Charr took prisoners. Several of our wounded have been carried off.
Prince Rurik: Ascalonians will live in fear of these beasts no more. We march to the north, to free our brothers and take back that which has been taken from us.
Follow-up[]
- Upon completion of the mission players will find themselves in Frontier Gate.
- To continue the storyline, take the quest Ruins of Surmia from Warmaster Riga.
Notes[]
- This mission can be run, providing the runner is equipped with running skills (e.g., Sprint or Dodge) and is strong enough to defeat the boss at the end. There appears to be no actual need to repair the trebuchet to complete the mission. Once the rusher has reached the second trebuchet (point D on the map), and as indicated above, firing the second trebuchet should kill the final boss, thus completing the mission. Should the second trebuchet fail to kill the final boss, there is a "false" section in the wall, NW of the second trebuchet, that will allow you to sneak past most of the Charr still remaining in the blast pit, and allowing quicker access to the final boss.
- If you're strong enough, it is possible to kill the large group of Charr without the trebuchet and finish the mission without firing it.
- The quest Deliver a Message to My Wife is found in this mission. Talk to Gurn Blanston to receive it. He can be found to the west of the first building up on the hill (A on the map).
- The trebuchets deal damage via the skill Statue's Blessing.
- If you are able to avoid the first boss in the mission, the soldiers that joined you will stay following you until the very end of the mission. This does not affect either the Mission or Bonus in any bad way.
