This is a mission entry. For information on the location The Deep, see The Deep (location).
The Deep is an Elite Mission accessed from the Luxon capital Cavalon. The area is the home of Kanaxai, a dark demonic creature that is the source of the Nightmare Horde and the corruption of the Outcasts which threatens humans in the Jade Sea. The objective of the mission is to find and destroy him.
To Access this mission, see the Elite Mission article.
Mission Objectives[]
- Find and destroy the source of the Luxon outcasts and Oni.
The mission does not "end" in the literal sense. After defeating Kanaxai, the party can stay in the Deep as long as they would like.
General[]
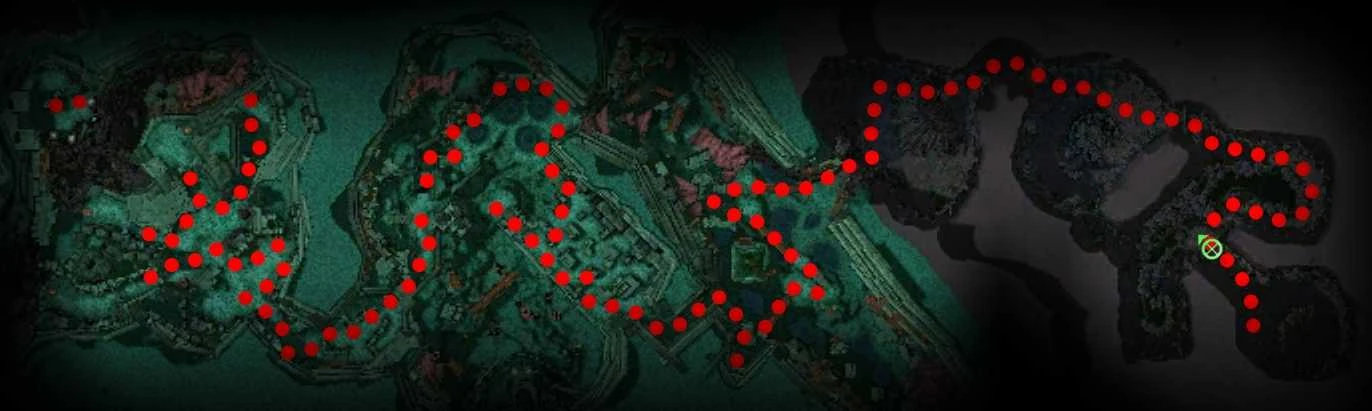
Map of The Deep
Area Name: The Deep (mission)
- The first half of the Deep has the same look and feel as the deeper areas of the Jade Sea (like Rhea's Crater). The latter half is a dark cave with wide corridors.
- Party size is 12.
- You can take heroes with you, but there are no henchmen to take.
- A party wipe out returns the party to the Deep outpost.
- Because of the large aggro that takes place in many situations, AoE skills are a great plus in this area. This includes offensive and defensive skills. Offensively, skills (and character builds) that are aimed at damaging multiple foes (Meteor Shower, Destruction, Ashes, Spiteful Spirit, traps, ..., etc.) will be very effective. Likewise, defensively, group protection spells (like Aegis and Wards) and healing (like Heal Party, Life or Light of Deliverance) pay great dividends, especially since the party size is 12.
- Sweeping is needed in the later parts where there are large numbers of pop-up groups.
- This area has a lot of surprises, patience is key.
- All areas will have a negative Environment Effect that is placed in effect by a Kanaxai Aspect creature. Eliminating the Aspect will make the area much easier.
- In the early going, each area will have a locked gate at the end. This gate will only open if all the enemies within the room, apart from the Aspect, are slain.
- Rebirth is a must. There is a situation where certain party members will die past a barrier and must be rebirthed to join the party.
- Energy boosting skills such as Blood is Power and Blood Ritual are very valuable, if you bring monk healers, as the constant casting of Heal Party can quickly drain the energy of the monks in the party.
- Gale can be incredibly useful for re-directing aggro on the Kanaxais when they run by the warriors. "None Shall Pass!" on the warriors can also be handy in this scenario
Area by Area Walkthrough[]
Arrival room[]
| Aspect | Aspect of Exhaustion |
|---|---|
| Description | While under this aspect, you suffer from exhaustion every 30 seconds. |
| Tips | Quickly split up for the divisions in room one. |
There are no enemies in this first room. There are 4 portals, each leading to a small room with a Kanaxai Aspect and a few Ripper Carps and other Scourge Mantas.
The party will have to split into groups of three. Depending on the composition of the party, they could either try and clear all rooms simultaneously or designate a couple of teams to clear their rooms and then go help the others with their rooms.
Aspects of Exposure, Surrender, Death and Soothing (Room 1)[]
| Room | Left | Center left | Center right | Right |
|---|---|---|---|---|
| Aspect | Aspect of Exposure | Aspect of Surrender | Aspect of Death | Aspect of Soothing |
| Description | While under this aspect, you cannot "block" attacks. | When under this aspect, whenever you are struck by an attack, you are knocked down. | While under this aspect, you receive 20% less benefit from healing. | While under this aspect, it takes you twice as long to gain adrenaline. |
| Tips | Use alternative protection prayers such as Shelter, Union or Protective Spirit or just use plain healing. | "I Am Unstoppable!", Dolyak Signet, Balanced Stance and Ward of Stability help. | Use strong healing or health regeneration. | Use energy based attacks or rely on a caster to take out the enemy. |
A riposte spammer is helpful against the aspects because they only use melee attacks.
Each room's door will open if the mobs around the Aspect of Kanaxai are defeated. After clearing a room, the group will have access to Room 2 (see below). They can run (or fight carefully with luring) until they get to other rooms that have been open.
Aspect of Pain (Room 2)[]
| Aspect | Aspect of Pain |
|---|---|
| Description | While under this aspect, you suffer -2 Health Degeneration and suffer from the effects of Deep Wound. |
| Tips | Life, Heal Party or Recuperation will deal with this. |
This room is filled with Ripper Carps, Scourge Mantas, Blessed Mantas and Darkened Irukandji. The party should watch out for the Irukandji's Restoration spirits, since they resurrect. Taking a Ritualist that can kill spirits fast will solve this. They move in several groups that can present massive aggro if not separated. The groups that have cleared their rooms earlier will have to take them on.
After defeating these groups, the party can kill Kanaxai Aspect of Pain to open all the doors of the previous rooms. The party can then go to any rooms that were not cleared (party members waiting or dead) and clear them. This will enable the party to get all its members together again.
Aspect of Lethargy (Room 3)[]
| Aspect | Aspect of Lethargy |
|---|---|
| Description | While under this aspect, you move 50% slower. |
This room is filled with Leviathan Fish. The party tanks can form a wall left and pull the first group, block the Leviathan Arms and then take out the Leviathan Minds and Leviathan Heads. this will be done with the center group and then the right group as well. Casters should be careful as the Leviathan Heads use Choking Gas for interrupts. After clearing them, the party can take out the Kanaxai Aspect of Lethargy.
After clearing room 3, five members of your party will have to stand on square, wooden panels that open the gate to room 4. If any of them moves the gate closes again, so these 5 players cannot join the rest of their party by simply running to join them.
As soon as the party members past the gate reach a certain point (usually after clearing the first two groups of Outcasts) a horde of Sapping Nightmares and Freezing Nightmares will pop up at the far corners of room 3. They will march towards the gate of room 3, so they will certainly massacre the 5 players left behind.
It is important that as soon as the designated 7 players make it past the gate that the 5 other players run to the gate and wait there so that after they are killed, the party monks can use Rebirth to bring them across the locked gate. It is possible to destroy all the nightmares. The 5 players left behind can fight them at the locked gate with support from the 7 players past the gate. However, this is somewhat pointless since the Death Penalty caused by simply dying is quickly removed due to the many fights and high level of monsters.
It is also possible to use the skill Recall if you are a first or second profession assassin. This will keep you from dying, so you can help the rest of the group without receiving a Death Penalty. Another option is for party members to carry a vampiric weapon with them on the mission. The 5 remaining behind can run to the closed gate, equip the vampiric weapon and once dead, simply be "rebirthed" on the other side of the gate by a fellow player. It is still advisable if you choose this method to kill the Nightmares coming up behind you before engaging any enemies in room 4, because as soon as the Aspect in room 4 is killed the gate into the room will open and the Nightmares will charge your party from behind.
Aspect of Depletion (Room 4)[]
| Aspect | Aspect of Depletion |
|---|---|
| Description | While under this aspect, every 30 seconds, you lose 10 Energy and take 8 points of damage for every point of Energy lost this way. |
| Tips | Pull and clear groups before entering, pull and kill the Aspect quickly. |
The clearing of this room begins from the previous room. This room is filled with about 5 Outcast groups and one can be taken out from behind the door before the party splits in room 3. Once inside (after the 5 remaining members have been pulled in with Rebirth), the party can take out another group. Careful use of energy is important as the Aspect can take out 10 energy when it is most needed.
After taking out the second group, the party should try and pull Kanaxai Aspect of Depletion and kill him before engaging the 3 remaining Outcast groups. After he is gone, taking them out should be routine. Casters should watch out for Maelstrom and everyone should stay clear of corpses because the Outcast Deathhands will sometimes use Putrid Explosion.
Aspect of Failure (Room 5)[]
| Aspect | Aspect of Failure |
|---|---|
| Description | While under this aspect, all of your spells fail. |
| Tips | Fight outside the room. |
The casters in the party should stay behind the door in room 4. The tanks and trappers (if used) should set up at the door. A puller should go in and get the groups of Outcasts. Because the Outcast Reavers use "Charge!", they are an easy pull as they will have a speed advantage. By body-blocking at the door, these groups can be dispatched easily.
After clearing these groups, the room will have Outcast Raiders and Kanaxai Aspect of Failure left. The party can choose to run past them and head down the stairs to the next room, or (usually if there is a chest) wait at the stairs (Aspect's effect is not active there) and then pull Kanaxai's Aspect. After he is killed, the party can easily dispatch the Raiders.
Aspect of Shadows (Room 6)[]
| Aspect | Aspect of Shadows |
|---|---|
| Description | While under this aspect, you cannot use enchantments or be targeted by enchantments. |
| Tips | Rely on straight healing until Aspect is defeated. |
The bottom of the stairs from room 5 will have many Oni of the Deep pop-ups. A party member should sweep ahead and bring them to the party. In the middle of this area is the Leviathan encased in jade. It will break free as soon as the party gets close enough to it. The Leviathan is surrounded by Reborn Irukandji who constantly put up a spirit of Disenchantment. These Irukandji will respawn shortly after being killed.
After clearing the Oni, the party should hug the left wall and move swiftly. Another group of Oni await just past the Leviathan, so players should make sure they have cleared its range since it's impossible for monks to counter the damage from the Leviathan without enchantments. However a ritualists weapon spells still work.
Kanaxai Aspect of Shadows will be waiting past that spawn of Oni. Dispatching him should make matters easier (the party can even take on the Leviathan now with proper tactics, though killing it is unnecessary). As the party continues to hug the left wall, they will encounter a large group of Oni and then they will come to a sole Reborn Irukandji next to a flight of stairs going down to the next area.
Warning: It is important to keep that Irukandji alive and if it's killed to wait for it to respawn. This will make clearing the next area easier at first.
Scorpion Aspect (Room 7)[]
| Aspect | Scorpion Aspect |
|---|---|
| Description | While under this aspect, every 30 seconds, you are teleported to the nearest foe and knocked down. |
| Tips | Keep the Irukandji at the top of the stairs alive in the early part. Use Heal Party to help those teleported. |
The significance of leaving the Reborn Irujandji alive is to prevent the Aspect effect in this room from tossing party members to enemies as they approach. By staying closer to the Irukandji than the patrols below, any party member (if teleported) will just be taken to the Irukandji, because the effect teleports one to the nearest foe.
Note: The Aspect in this area does not match the description. The teleportations and knockdowns take place almost every 10 seconds or so.
This is one of the more difficult and potentially confusing areas in the Deep. To clear the first half of this area, a puller (preferably a tank) needs to go down the stairs to cause the hidden Oni of the Deep groups to pop up. There are several groups (and some spawn from far away) so patience is needed. The rest of the party should camp at the top of the stairs and take out groups as they come.
After the Oni are dispatched, the party should take out the nearest patrol of Outcasts, and then the second one to its right. The party then should all rush in and hide in the little nook up a flight of stairs to the right. In that spot, the party can take out another group. The party should then hug the right wall and advance ahead. They will encounter one group of Outcasts before Kanaxai Aspect of Scorpions. This should leave two groups of Outcasts which the party can take out later or simply ignore.
When fighting the Aspect, healers should be careful, as the effect will pull everyone to him. And then with his high damage and Demonic Agility, he can kill a party member very quickly while they are recovering from the knockdown. Therefore, group-wide protection like Aegis, Shelter, and Displacement is very useful.
Aspect of Fear (Room 8)[]
| Aspect | Aspect of Fear |
|---|---|
| Description | While under this aspect, you move 10% faster. You take 25 damage each second you are moving. |
| Tips | Use Life regularly. |
Upon entering this area, it will be empty. But as soon as the party goes into the corridor and turns the corner, several groups of Oni of the Deep and Freezing Nightmares will appear behind them and chase them.
The best strategy is for the party to go to a corner and all pile up there (to stop moving) and then use AoE attacks and traps to obliterate the Oni and the Nightmares. After they are destroyed, the party can proceed at its own pace with no rush.
There will be three bridges along the way. At the end of each bridge there will be a thorn flower and a few groups of Oni pop-ups. By now the party should be well-versed in luring them and holding them off. At the end of the last bridge will be the Kanaxai Aspect of Fear with several Oni pop-up groups. Depending on where the Aspect is standing, the party should either pull and kill the Aspect first, or sweep the area and destroy the Oni first.
Aspect of Depletion (Room 9)[]
| Aspect | Aspect of Depletion |
|---|---|
| Description | While under this aspect, whenever your Energy hits 0, you take 50 damage. |
| Tips | Avoid the Chaos Storms, use Blood Ritual/Blood is Power if needed. |
Starting from this room, the party will go into the depths below the Jade Sea. Gone will be the Jade surroundings as the environment will turn into a dark, misty cavern. At some places, the scenery is very beautiful.
This area is filled with Sapping Nightmares who specialize in energy drain. They are very fragile however. With proper tanking, pulling, trapping and/or nuking, very large groups can easily be dispatched.
Tip: When pulling the large groups of Sapping Nightmares, if everyone in your party makes sure not to equip a wand or staff, the Nightmares will not use Chaos Storm, but instead opt to use Spirit Shackles.
After clearing the nightmares, the party should hug one side of the cave and run past the Kanaxai Aspect of Depletion. Killing it is not necessary.
Aspect of Decay (Room 10)[]
| Aspect | Aspect of Decay |
|---|---|
| Description | While under this aspect, if you are Poisoned or Bleeding, you suffer an additional -4 Health degeneration. |
| Tips | Use Heal Party and Extinguish; pull away from flowers. |
This is a circular room with an island in the middle (atop which stands the Kanaxai Aspect of Decay). The circular path around the island is full of flowers that cause bleeding and poison. At the entrance, there will be a few groups of Oni of the Deep popping up.
It is best to not fight under the severe degeneration of these conditions. Instead, a tank (or two) should run ahead and pull groups as well as turn off flowers on either side of the left path. After the groups of Outcasts and occassional Oni are cleared, the group can proceed to the left and exit the room. Again, it is unnecessary to kill the Aspect.
Aspect of Torment (Room 11)[]
| Aspect | Aspect of Torment |
|---|---|
| Description | While under this aspect, you take 50 damage every 3 seconds if you don't use a skill. |
| Tips | Spam Heal Party and Light of Deliverance |
The environment effect is similar to being under the effects of Wastrel's Worry. This room is a winding cavernous path with several Oni and Nightmare pop-ups along the way. At the end of the path will be the Kanaxai Aspect of Torment, guarded by a group of Outcasts (though he can be separated from them).
Kanaxai's Chamber (Room 12)[]
| Aspect | Nightmare Aspect |
|---|---|
| Description | While under this aspect, you suffer -8 Health degeneration. |
| Tips | Heal Party and Light of Deliverance |
The final room is a wide chamber where Kanaxai will be seen standing alone. The room causes a constant health degeneration of -8. This degeneration does not go away even after the death of Kanaxai.
When fighting Kanaxai, be aware of the following:
- Kanaxai hits hard and fast. Every hit from him knocks his target down.
- He uses the Nightmare Refuge enchantment (1 second cast, approximately 10 second recast), which makes all spells and attacks targeted against him to have 50% chance to fail, and heals him for 1,000 health after 10 seconds if it is not removed before it expires.
- Finally, just as with the other aspects, he has health limit points, upon which he will stop taking damage (80%, 60% 40% and 20% of his maximum health). At this point, he, like his aspects, requires a knockdown or alternate means of health reduction such as life stealing. In Kanaxai's case however, any knockdown on Kanaxai spawns a mob of 8 monsters, their type depending on the Kanaxai's current health:
| Health break points (health left) | 100% – 80%: | 80% – 60%: | 60% – 40%: | 40% – 0%: |
|---|---|---|---|---|
| Monster | Sapping Nightmares | Freezing Nightmares | Oni of the Deep | A mix of all of above |
Tips for fighting:
- If you try a knockdown before you reach the next breakpoint, another 8 monsters will spawn for each knockdown inflicted.
- Use Spinal Shivers/Shivers of Dread on Kanaxai to try to prevent him from casting Nightmare Refuge.
- It is recommended to bring a Revealed Enchantment or Inspired Enchantment as it will remove Nightmare Refuge from Kanaxai but will not be replaced by it. This is very helpful for defeating him, as the skill here effectively has instant recharge, and you will gain energy by removing Kanaxai's enchantments.
- It helps a lot if you can body-block Kanaxai and trap all around him and around the monks when you knock him down. If there are sufficent traps, the spawning monsters don't stand a chance.
Alternate Strategy:
An alternate strategy to defeat Kanaxai is based on the fact that Kanaxai can only spawn a maximum of 24 foes at a time. The build uses this to spawn them at one spot and then kill him at another spot. This is how it works:
- Draw Kanaxai to one side of the room. Kanaxai does not quite follow regular aggro rules, so it will take a lot of enticing to get him to follow all the way. The best way is a well protected caster comes close to him (so that Kanaxai starts attacking that caster) and then the caster can slowly take a few steps at a time until Kanaxai is at the desired spot.
- Once Kanaxai is at or near one side of the room, tanks should surround him (to prevent him from running away), and then the party should knock him down at least 2 times.
- This will cause all 24 spawns to show up at this location. The party should then retreat and not engage any of the nightmares. If their number drops below 24, then knocking Kanaxai down later on will cause new spawns to appear.
- After the party is safe in the tunnel, the spawns will settle back near their original spawn location by the wall and Kanaxai will go back to the center of the room. The party should now proceed to the opposite side of the room.
- Again, someone needs to pull Kanaxai closer to that side (so that the spawns do not wander into the battle).
- Once Kanaxai is in place, the tanks need to body-block him in place so he does not try to run. Now nukers can fire at him freely (even with knockdown inducing Meteor Shower) as he will no longer spawn anything.
- Remember to constantly remove his enchantment.
- An alternative strategy is to have a W/A with Recall gather up the spawns to the left side of the room and have the remaining party members gather to the right. The W/A will remove Recall once all the spawns are as far left as possible and proceed to bodyblock Kanaxai.
Monsters[]
 28 Kanaxai Aspect of Death
- 28 Kanaxai Aspect of Decay
 28 Kanaxai Aspect of Depletion
- 28 Kanaxai Aspect of Exposure
- 28 Kanaxai Aspect of Failure
- 28 Kanaxai Aspect of Fear
- 28 Kanaxai Aspect of Lethargy
- 28 Kanaxai Aspect of Pain
- 28 Kanaxai Aspect of Scorpions
- 28 Kanaxai Aspect of Shadows
- 28 Kanaxai Aspect of Soothing
- 28 Kanaxai Aspect of Surrender
- 28 Kanaxai Aspect of Torment
- 30 Kanaxai
- 24 Oni of the Deep
- 24 Blessed Manta
- 24 Scourge Manta
- 28 Ripper Carp
- 24 Reborn Irukandji
- 28 Darkened Irukandji
- 28 Leviathan Arm
- 28 Leviathan Head
- 28 Leviathan Mind
- 28 The Leviathan
Notes[]
- The Zodiac weapons and shields use a unique skin art. They can only be found in the Deep and Urgoz's Warren.
- Heroes used to not work here. They can now use the teleporters at the beginning of the mission and therefore can continue throughout the rest of the map. Their usefulness now, after testing, far exceeds what was previously believed as it allows for heroes to be grouped up in to the same portal.
- Flag your heroes in to a portal (do this for all heroes in the group).
- Have your party go in to the fourth open portal
- Unflag your heroes and wait a few seconds and they will all be there for your enjoyment.
Party Splitting[]
The unconventional nature of this mission has spawned a standard code for distributing mission members to the various rooms at the beginning of the mission. The code consists of a 12-digit number, split into four groups of three digits each (e.g., 134 134 134 222).
The first number stands for the player on top of the party list, the second number for the second highest, and so on. The value of the number stands for the room that player is supposed to go to. So in this example, the top player will go to room 1, the second player from the top to room 3 and the third player from the top to room 4.
Rooms are numbered 1 to 4 counting from the right to left in the same order in which the teleporters will be activated.
The 134 134 134 222 party splitting is relevant when the party is ordered in the following manner:
1. Tank (Bring Tank and icy weapon)
3. Tank (Bring Tank and icy weapon)
4. Tank (Bring Tank and icy weapon)
1. Damage dealer
3. Damage dealer
4. Damage dealer
1. Healer
3. Healer
4. Healer
2. Healer (with party-wide heals)
2. Support (with interrupts for Kanaxai)
2. Battery (with skills against minions like Verata's Gaze)
Although this works it is much easier to have a tank, healer, and some type of ranged damage dealer (ele, ranger, ss necro, ect.) take the first room, and have them clear out their room and the area after it. This may take a bit of work to get right. Once that is done they can help the other groups out of their rooms, making it possible to use classes that would never have been used due to their weakness in the first rooms (mesmers work well in later areas).
External Links[]
- Related Guides
- [1] - Guild-Wars.info (German)