Overview[]
Summary[]
- You have three minutes to let Toma the drake feed on at least five enemies whose health is low enough for him to chomp them.
- See Chuno for your reward.
Obtained from[]
- Chuno in Marga Coast
Requirements[]
Reward[]
Dialogue[]
Chuno: I keep feeding Toma, but it's never enough! This beast has an insatiable appetite! It's not much of a village guardian if it's always out snacking on the local wildlife. It looks ready to munch on the villagers at any moment! Take this monstrosity off my hands and feed it as much as you can. If you feed it at least five enemies, I'll make it worth your while.
Accept: Sure! Let's go, Toma.
Reject: I heard that thing ate the last person who took it for a walk... no thanks.
Reward Dialogue[]
Chuno: Toma looks like it could eat a bit more, but I guess it should be enough for now.
- <number> Branch of Juni Berries
Failure Dialogue[]
Chuno: Reward? You want a reward for getting Toma killed? Ha!
Walkthrough[]
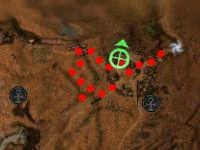
Path to some nearby kills
You can feed Toma more than five enemies. You will earn one Branch of Juni Berries for every 5 enemies (for 5 to 9 enemies you get 1, for 10 to 14 you get 2, etc). The Branch of Juni Berries given for the reward is used to hatch a Black Moa Chick. This isn't a very difficult quest to do as several Mandragor around the village spawn only when you are working on this quest. After taking the quest, head west from the village towards the bridge. A Mandragor Imp spawns just north of the bridge. Cross the bridge, then make a quick left to encounter a Stoneflesh Mandragor burrowing out of the sand. Just east of this, near the bridge south of the village, are a Mandragor Imp and a Stoneflesh Mandragor. There are a couple more Mandragor just north, between this bridge and the village. Head south across the bridge to fight the Kournan guards. This approach should get you to 10 enemies in the required time.
Alternatively, your team can generate its own food for Toma using two or more Minion Masters (Heroes or human players). MM #1 sacrifices herself and MM #2 uses the first's corpse to create two bone minions. Now, #2 kills himself to release his minions and allowing #1 to grow her own from the new corpse. Repeat for the remaining time. Ideally, your party should have at least two re-usable resurrect skills, so that minion-generation is not hindered by waiting for the MMs to recover their energy.
Large parties need to be cautious that they do not kill foes before Toma can feed upon them: take heroes rather than henchmen, disable unnecessary hero skills and/or set heroes to avoid combat, and ensure that human players allow Toma to get credit for the kills.
Notes[]
- This quest does not appear in your Quest Log.
- This quest is repeatable; Chuno will offer it again once you leave and re-enter the area.
- Toma makes an excellent tank for defeating the Acolyte in the castle; when his target foe reaches 20% health, he will kill it instantly.
- While it is possible to take this quest while the Undead Defenders quest is available or active, Toma will appear but not follow you outside of the village.
- You cannot claim the quest reward until the countdown timer ends, even if if Toma has eaten 5 or more enemies.
- Toma only gets credit for a kill if the kill is made by his Feeding Frenzy skill; any beasts killed by the party or by Toma using other skills will not count towards your total.
- Like other NPC allies, Toma has trouble with pathfinding and targeting enemies efficiently. You can mitigate this by bringing skills that boost party speed.