|
|

|
| Before proceeding, be sure to Read: Droknar's Forge run in the PvE Glossary for Advice, Warnings, and related Info on this Run |
The Droks run is one of the harder and longer runs in the game, but as long as you have a proper build and learn the timings and shortcuts, you will be fine.
Some important rules when running Droks (and any other place), no matter what build you are using, are listed below:
- Keep moving. Avoiding damage means getting out of aggro as fast as possible.
- Learn where knockdown occur — builds using IAU and DT as their anti-kd will be often vulnerable, so correct timing is vital (especially in Snake Dance).
- Use shadow steps as often as possible — use these whenever they are recharged: Death's Charge (as your main healing), Dark Prison, and Heart of Shadow.
| Expanded Hazard Key |
|---|
| Conditions: |
| Enchantment stripping: |
| Slowing Hexes: |
| Knockdowns: |
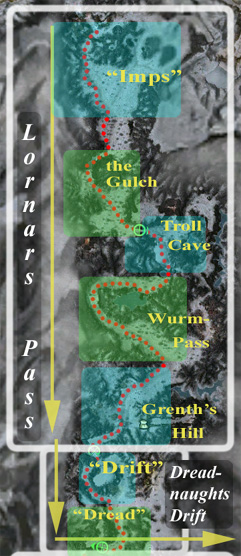
Lornar's Pass[]
Imps[]
- Hazards
- →
 → →
→ →
Welcome to the opening portion of Droknar's run, where all the hexes lay. Use sf or vos near imps/golems here. Once you've made it past the field of Imps and the first 2 indentations on the right-side wall, you'll come to what looks like a safe shoulder. However this is not true for there are pop-up wurms in it. Be prepared by activating your Knockdown protection (which should be IAU) the moment you reach the first tree after the turn.
The Gulch[]
- Hazards
- → → →
Once you get past the wurms, you are immediately confronted by a group of Avicara. ...And they can really put the hurt on any runnner unless you move fast.
After powering through this first group of hard-hitting "birds", just beyond them, is the first real group of Golems and "Trees" who are ready to hex if you don't put up you anti hex skill. After you gotten past the golems, run past the grawls and another spawn of golems.
Troll Cave[]

- Hazards
- →
There are several different methods for getting past the somewhat narrow cave. The first of which is by shadow stepping. But there are also other methods such as anticipating their movements while also anticipating "Lag". Maintaining 33% movement speed or better via stacking Run-Buffs is generally the easiest way to achieve this and is highly recommended for any runner in this situation. With enough practice at it, an experienced runner can read the Lag and "get there" before it even occurs. ...Just don't be in too much of a rush to leave the cave because a Wurm is often waiting just beyond it.
Wurm Pass[]

- Hazards
- → → →
When running this portion, it is crucial to know where to activate your anti-kd skill (if using Iau and DT, the correct usage is to dt 1 sec after you leave the bridge, iau just before shadow stepping to the grawls, dt at the turn, and iau down the hill ).
Grenth's Hill[]

- Hazards
- → → →("Lag")
This area contains massive clusters of Grawl and Golems. So use your anti-hex and get moving.
Dreadnaught's Drift[]
Drift[]

- Hazards
- → → →
Immediately upon entering the zone, there will be a Stone Summit patrol closing in on you from above. This is often why survivor runs are hard in a group (See the PvE glossary-split Talk page for a possible work-around). Fortunately the west side of the round-about only has 1 group of Summit and they're easy to run through.
Dread[]

- Hazards
- →(Giant Stomp)
In this second portion, a runner gets a taste of the Tundra Giants that will be dominating the trail for the next 4 subsections. Anti kd skills are crucial here. Even though these Giants are technically warriors, they attack from long range with a significant I.A.S. boost, giving them very high Damage per Second.
- One of the best counters to Tundra Giants is Damage reduction insignias.
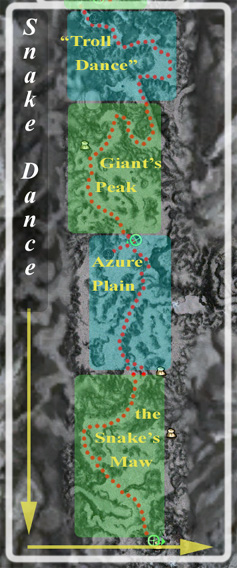
Snake Dance[]
Troll Dance[]
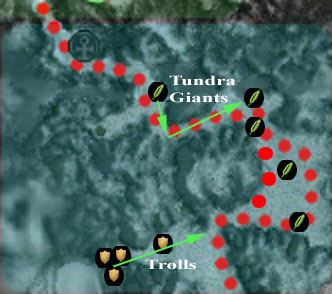
- Hazards
- →(Stomp)
What you should be trying to do in this zone is to not stop moving and run as fast you can. If all is done well you will find your anti-kd skills recharge the moment you need them.
Giant's Peak[]
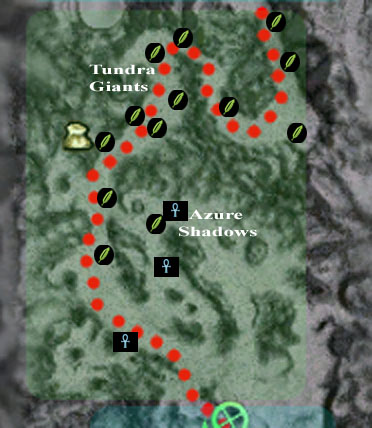
- Hazards
- →(Stomp) →
The biggest challenge here is simply remembering to maintain all of your speed boosts, and knockdown protection. Beyond them is a nice clear path to the rez shrine with a small chokepoint that appears to be solid rock, but can actually be tread right over.
Azure Plain[]

- Hazards
- →(Stomp) →
This next portion is deceptively barren and that's what makes it dangerous as groups of Azure Shadows (Smiting nightmares) pop up and use a Signet that ignores Armor and anti-casting Elites while also causing knockdown. The stretch beyond this small path is fairly easy. In any case, constantly maintain your Knockdown protection and don't let it lapse until you're right next to their camp site.
The Snake's Maw[]
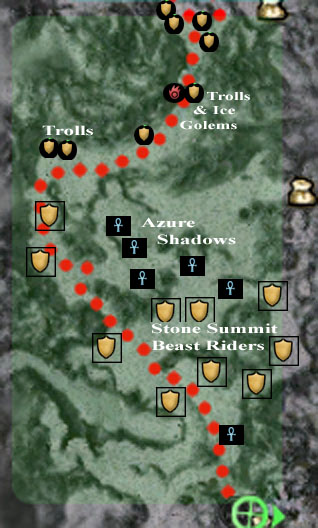
Do not be worried about getting stuck in this cave, simply run.
In addition to already being chased by a dozen Trolls, there will be a boss-spawn of Trolls inside the south end of the cave that often includes Ice Golems who will bypass any hex-prevention skills you could be carrying, by directly applying a "slowing hex" with ![]() Frozen Burst (PbAoE targeted) as you attempt to run by them (although this is a minor, if even an issue: only lasts like 5 seconds).
Frozen Burst (PbAoE targeted) as you attempt to run by them (although this is a minor, if even an issue: only lasts like 5 seconds).
Once past this point, it's a simple matter of avoiding a few more Troll armies and just maintaining KD protection as you run past some small groups of Griffons and Summit Giant Herders that are only accompanied by Dolyak Masters. This is made even easier by the fact that they'll be too busy fighting with eachother to notice a single runner.
- Camp Rankor lies dead ahead and allows the party size to be increased by atleast 2 more members for the final stretch to Drok's Forge.
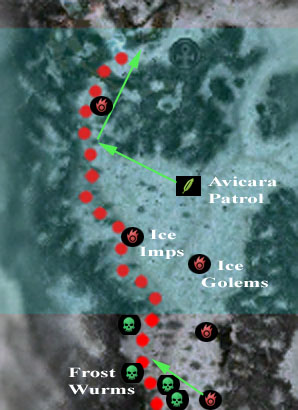
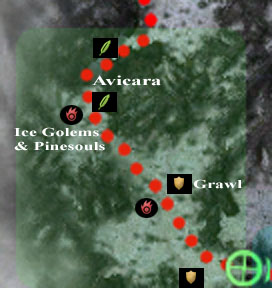
Talus Chute[]
- Hazards
- → →
Talus Chute is rather unique in that the middle half of it has no enemies at all, while the 100 or so feet before and after the first rez-shrine at the start has at least 1000ft'.s worth of mobs all living together, including the largest Avicara spawn you're likely to find anywhere, and up to 3 pop-up mobs right above them.
The easiest way is to just run past them. If you do it correctly, you can live with anywhere from 1 health to 200 health (no healing required). The key point is to know that deep wound does not kill.
Popular running builds[]
The most popular builds for running to Droknar's Forge are listed below: (links go to PvX Wiki)
- / Build:D/A Unstoppable Drok's Dervish
- / Build:A/R Shadow Runner
- / Build:W/any Generic Runner
- / Build:Any/A General Shadow Forge Runner
Additional Notes[]
Trivia[]
- When approaching Beacon's Perch from Lornar's Pass, the entrance doors always appear shut, but never actually are.
- While elaborately detailed, the Shrine to Grenth serves little purpose other than Buying Morale Boosts, because of its location.
- Full exploration of the entire 'run' with the right build can net nearly 7% towards the Cartographer title
- The linear distance from Beacon's Perch to Camp Rankor is roughly four-times that of the distance from Rankor to Droknar's Forge itself. Yet despite this, many "Pro runners" split the cost straight down the middle between each destination.
Resources and external links[]
- Additional running builds can be found at PvX Wiki.
There are many "Drok's Run" demonstration videos available on YouTube™, including a HARDMODE version:
Droknar Forge run trail[]
This mod basically shows you the path to take on your mission map/local world map with thin red line as a trail to follow
- Note, you will need Texmod to load the following mod in your map data
- Creator: User:Wracks
- Download: DrokRun Trail Texmod Download
- Sample: On mission Map, On local Map